Examples
Hover over the images to view the querystrings used. All commands can be combined.
Resizing using maxwidth and/or maxheight
Aspect ratio is always maintained with maxwidth and maxheight. The image is scaled to fit within those bounds.


Resizing using width and height
Specifying only one of width or height will behave the same as using maxwidth
or maxheight. The difference is when you specify both.
Specifying both width and height will force the image to those exact dimensions, unless the
image is already smaller (see scale). This is done by adding whitespace to the image. To center and crop instead, use
&crop=auto. To lose aspect ratio and fill the specified rectangle, use &stretch=fill.


Scaling
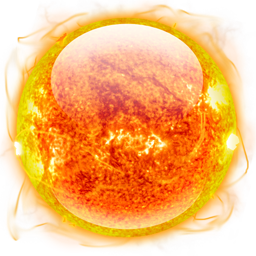
By default, images are not upscaled. If an image is already smaller than width/height/maxwidth/maxheight, it is not resized.
To upscale images, use ?scale=both. ?scale=downscaleonly is the default.

The slight blur around the edges is a bug in Graphics.DrawImage(). You can control the color by setting
&bgcolor=color|hex.
Upscaling the canvas is sometimes desired instead of upscaling the image when it is smaller than the requested size. Use ?scale=upscalecanvas to achieve this effect.

Cropping
To enable cropping, you can use &crop=auto, which minimally crops and centers to preserve aspect ratio, or custom cropping.
&crop=(x1,y1,x2,y2) specifies the rectangle to crop on the image. You can still resize and modify the cropped portion
using the other commands as normal. Negative coordinates are relative to the bottom-right corner -
which makes it easy to trim off a 50-pixel border by specifying &crop=(50,50,-50,-50).
 "Cropping out a 200x200 square using ?crop=(10,150,200,350)")
 "Cropping out a 200x200 square using ?crop=(60,200,250,400)")

Rotation
Rotation is easy - just specify the number of degrees. You may want to set bgcolor also.

 "Using ?rotate=-30&crop=(60,200,250,400)")

Flipping
You can horizontally or verically flip an image, as well as both. &flip=h|v|both
 "Using ?flip=v&crop=(60,200,250,400)")
 "Using ?flip=both&crop=(60,200,250,400)")
 "Using ?flip=h&crop=(60,200,250,400)")
Source flipping
Since normal flipping applies after rotation and cropping occur, it can be
difficult to work with if you are just wanting the source image flipped before the other
adjustments are applied. To flip the source prior to work, use &sourceFlip=h|v|both.
Note how the same crop coordinates return different sections of the image. This is because the source image is flipped before *anything* happens.

 "Using ?crop=(0,0,100,100)")
 "Using ?flip=both&crop=(0,0,100,100)")
Stretching
To stretch an image to width and height, use &stretch=fill.
")
Padding
You can add padding around the image with &paddingWidth=px and
&paddingColor=color|hex. paddingColor defaults to bgcolor, which defaults to white.
This setting can be.... useful.

Borders
You can add a border around the image with &borderWidth=px,
&borderColor=color|hex.

Output format
GIF, JPG, and PNG output is supported. BMP and TIFF input fils are additionally supported, and every format can be converted to any other format with &format=jpg|png|gif
Jpeg compression levels 0-100 (&quality=0-100)
The sizes of these images range from 855B to 12KB. The largest size jump is from 90 to 100 (5KB to 12KB). I think 90 is a good balance, and is therefore the default.


Quantization (8-bit PNG and GIFs)
The default GDI quantization is terrible, and produces lousy GIFs. Using the Octree quantizer, you can
control the number of colors (and therefore the size and quality) of an image using &colors=2-255
GIFs, in 4,8,16,32,64,128, and 256 colors


PNGs, in 4,8,16,32,64,128, 256, and 16 million colors


Transparent GIFs and PNGs
Transparency is maintained when resizing PNGs

Matte backgrounds can be applied with bgcolor.


Transparent PNGs can be converted to transparent GIFs
It's ugly, but GIFs only get 1 bit for transparency.
Transparency is maintained while resizing GIFs
Here we upscale a normally tiny GIF

/resize(width,height,format)/ syntax
For the URL-conscious, you can replace img/image.jpg?maxwidth=x&maxheight=y with
img/resize(x,y)/image.jpg. A third argument, format, is also allowed.